

Now that we are moving into the autumn months it is a perfect time to take those wonderful summer memories and create pieces of art from them.
One of my favourite activities is embroidery. First, I must admit that my style is more free than most, I love the freedom of creating my own patterns, so if you like free-styling, this project could be for you.
When I am creating my own embroidery projects I usually work from my imagination coupled with photographs and so in this Seascape project, my starting point was the numerous times I had visited the coast in Cornwall. I grew up there and the coast is always in my soul.
The beauty of this project is that it encourages mindfulness, concentrating on the tiny stitches slows your breathing and relaxes you, and because you don’t have to follow a pattern you simply immerse yourself in the colours and think back to the summer.
For me, when I was sewing this I was recalling the feel of the sand beneath my toes, the bracing fresh air and the crashing waves.
I can sit on the beach for hours and never be bored. With my camera, or phone I can take photo after photo and never seem to have enough shots. My favourite beach is Porthmeor in St Ives, the sand has a very special feel, the quality of the light and the intensity of the colour of the sea is one of the reasons why so many artists have been drawn here over the years.
And so to the project, this is a project designed to use the simplest of stitches, cross stitch, but the secret is in the selection of the colours of the embroidery threads.
Like any creative activity, it is important to feel invested in the project, which is why a small embroidery can be a good place to start. Like using colouring books, creating seascapes like this can be very relaxing as this type of pattern is very easy to follow, you are simply sewing in lines to create the elements.
Cross stitch is one of the simplest stitches, and when it is used with linen or Aida and tiny stitches it can be very effective when creating land or seascapes.

Step 1. Creating your own seascape
As a first step, think about creating your own seascape, I used a combination of my imagination and photographs to identify the colours needed for the threads and the layout. Sometimes I draw a picture first to help with the positioning of any images. This project is all about personal choice, so feel free to choose the colours of threads that work for you. Every seascape will be unique to the creator.
Step 2. Gather the resources
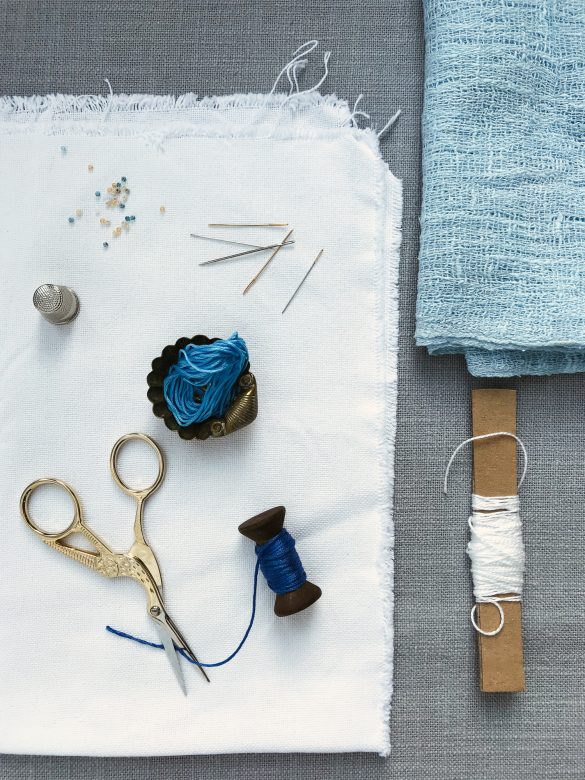
In order to create this project you will need to gather some materials to get started. I have tried to identify materials that should be easy to source either online, or through hobby, craft or haberdashery shops.
The Background Material
Choose your material, for this project I used off white linen as the background material. For a first attempt you may prefer to use Aida fabric, where the spaces for the cross stitches are more defined. Aida fabric is usually described as being available in a number of different counts; the most common counts in Aida are 14 -18 for a project like this. The higher the number, the smaller the stitches will be, because there are more stitches in each inch. You can normally purchase Aida in packages of pre-cut sizes, if you choose linen you can purchase this in small amounts from fabric/haberdashery shops, or you may find vintage linen in charity shops.
Needles – I use a gold plated embroidery needle, but other needles are also available. Embroidery/tapestry needles normally have a blunt end and a larger eye, Size 24-28 is usually suggested for cross-stitch.
Embroidery Threads – a selection to create the following:
The sea, sky, cliffs, beach, For this project I used Anchor Stranded Cotton threads, but there are a number of other well-known brands. For this project the important factor is to try and find as many complementary shades as possible for the sea and the sky. Like choosing coloured pencils, the shades of the threads create the atmosphere of the sea and sky.
Here are some suggestions:
For the sea and sky, any combination of blues, for example:
Anchor: 117, 118, 120, 122, 128, 136, 159, 140, 433, 1038, 1039
Multi coloured threads for added interest for example: 1344
For the sand: Anchor 387, 300, 305 or any shade from beige to yellow.
Waves: Thicker white cotton, or use 4 threads from the 6 threads skein in white.
Cliffs – any shade from brown through to black depending on your preference.
Embroidery hoop (optional).
Frame to mount finished article.
Step 3: Method
This project is designed to help relaxation, so a comfortable seat, good lighting, an open mind, freedom of thought, and some spare time is the perfect setting to get started.
As I had already purchased a frame I knew what size I wanted to create and so I measured and cut the fabric allowing a generous border working on a finished piece of 12 x 12 cm. (Approximately 5 x 5 inches)
Some people prefer to use an embroidery hoop to hold the material taut. Also it is important to make sure that the material doesn’t fray, so as well as a generous border, you may want to bind the edges with masking tape.
I normally use two strands of the six strands in the embroidery threads. Sometimes in order to create even more variety in the shades of colour in the sea or sky I use combinations of one strand mixed with one strand from another colour. You can also use multi-coloured thread.
If you need to learn how to create cross stitch there are many tutorials available online, but essentially you are taking the thread through the material to create a cross, if you want to keep an even look across your piece sew the diagonal stitches in the same direction, but as the sea has texture this is less of an issue in this piece.
For the sea I normally work with shades of blue ranging from turquoise to dark blue, and the sky a paler blue. For the waves crashing on the beach I used a slightly thicker white cotton thread.
I started from the middle of the fabric and worked down for the sea and then up from the horizon into the sky. Finally I added the waves and then sand, plus a selection of beads just for added interest.
As you sew try and keep a similar size and tension in the cross stitch, this is where using a hoop can help, but keep checking that you are not stretching the fabric too much.
Step 4: Finishing off
Once you have finished ensure that all the threads on the back of the work are carefully finished off.
Press the piece with a damp cloth on the reverse, and finally I added a frame to complete the picture. If you are planning a series of little embroideries try and buy the frames at the same time.
I hope you will enjoy creating your own memories!
If you would like to purchase the same threads I have used, I normally buy them from LoveCrafts.com, click here to visit their Anchor Threads page.
If you are looking to take your embroidery further we will be featuring more sources of inspiration very soon. In the meantime you may be interested in looking for your own projects here https://www.searchpress.com